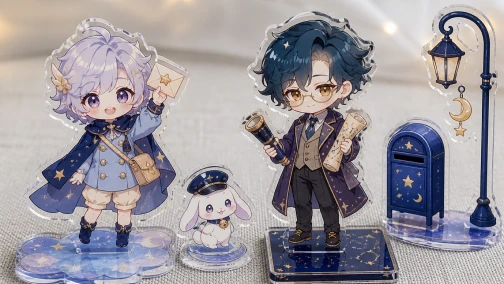
Short answer: to manufacture custom acrylic keychains, a factory needs a full-size print file at 300 DPI in CMYK color, a vector cutline on its own layer, a bleed extension around the artwork, a clearly separated white ink layer, marked hole placement, and a note on whether the piece prints single- or double-sided. Send these elements together and your order moves straight to proofing instead of bouncing back with questions. The sections below walk through how to prepare artwork for custom acrylic keychains in the order a production team checks each element, so you can hand over print-ready files on the first attempt.
What the Factory Needs From Your File
Before looking at any setting, it helps to know what a prepress operator actually opens your file to find. A complete acrylic keychain file setup contains:
- A print layer at final product size, three hundred DPI, in CMYK color mode
- A vector cutline that defines the silhouette the laser or CNC cutter will follow
- A bleed extension so color runs past the cut edge
- A white ink layer showing where opaque white prints beneath the color
- A marked hole position for the keyring or clasp
- Clearly labeled front and back artwork if the design is double-sided
- Outlined fonts, or the font files themselves
Anything missing from this list becomes a clarification email, and every clarification email adds days to a made-to-order timeline. Treat the file as a technical drawing that happens to contain your art, rather than an image that a printer will figure out.
Canvas Size and the 300 DPI Rule
Set your canvas to the physical size of the finished keychain. If the charm will measure five centimeters tall, the document should measure five centimeters tall at three hundred DPI, which works out to roughly five hundred ninety pixels of height. Three hundred DPI at final size is the standard that supplier artwork guides consistently reference, and it is the resolution at which UV printing stays sharp at reading distance.
The most common canvas mistake is submitting a file pulled from a social media post or a web shop listing. Those images are usually seventy-two DPI and heavily compressed. Enlarging them afterwards does not recover detail; it only spreads the same pixels over a larger area. If you prefer to draw at twice the final size for comfort, that is acceptable, but state the scale clearly in your file name or order note so prepress can reduce it correctly.
One practical check: place a piece of text at the smallest size your design uses and view the canvas at one hundred percent zoom. If the text is crisp on screen at actual size, it will print crisply. If it already looks soft on screen, the acrylic will look softer.
CMYK vs RGB: Convert Before You Send
Screens display color by emitting red, green and blue light. UV printers build color by laying down cyan, magenta, yellow and black inks on a white base. The two systems cover different ranges, and the overlap is smaller than most artists expect. Highly saturated blues, electric greens and neon pinks that glow on screen will shift toward duller, flatter equivalents once converted to CMYK.
Convert the file yourself before submitting. When you convert in your design software, you see the shift on your own monitor and can adjust saturation, warm up skin tones, or deepen shadows while the artwork is still under your control. When the factory converts the file, the same shift happens without your input, and the proof becomes a negotiation instead of a confirmation.
For color-critical orders, such as brand mascots or a palette matched to other merchandise, approve a physical sample before the full run. The confirmed sample or proof is the color standard for the batch, and final specifications always follow the confirmed quotation and proof rather than general guidelines.
Planning Transparent Areas on Clear Acrylic
Clear acrylic is a design material of its own. Any pixel left transparent in your file becomes a window of bare acrylic in the finished piece. Used deliberately, this produces floating line art, see-through clothing layers, glass effects and negative-space lettering that buyers notice immediately. Used accidentally, it produces a charm where a character's face has a transparent hole because a layer was turned off during export.
Decide early which regions of your design stay clear, and verify the transparency by placing your artwork over a bright background in your software. Mark the intended clear zones in your order note as well. A sentence such as "the background ring stays fully transparent" removes all ambiguity for the prepress team and keeps the proof cycle short.
How the White Ink Layer Works
CMYK inks are translucent. On clear acrylic, a color printed without a base looks like stained glass: visible, but washed out and dependent on whatever is behind the charm. The white ink layer solves this. It is a separate layer in your file, typically filled with a solid spot color such as one hundred percent magenta and named "White Ink," that tells the printer exactly where to lay down opaque white beneath the color layer.
Wherever white ink prints, your colors appear solid and opaque. Wherever it is absent, the acrylic stays clear or the color prints translucently. This gives you three finishes from a single file: solid color, translucent color and fully clear acrylic. Partial-strength white layers can also produce frosted, semi-opaque effects on designs that call for it.
Cutlines, Bleed and Safe Zones
The cutline is a vector path that tells the cutting equipment where the acrylic ends. Keep it on its own layer, drawn as a clean stroke or filled shape in a dedicated spot color, and never rasterize it into the artwork. A smooth cutline with gentle curves cuts faster and produces stronger charms than a path full of knife-point corners. Extremely thin bridges between parts of a design can snap in daily use, so keep narrow sections thick enough to survive being pulled on a bag; your factory contact can flag fragile geometry during proofing.
Bleed is the extension of your artwork past the cutline. Supplier guides commonly ask for roughly two to three millimeters of bleed so that minor cutting drift never exposes an unprinted edge. In the other direction, keep text, faces and key details inside a safe zone a couple of millimeters from the cutline, so nothing important risks being clipped. Exact bleed and safe-zone figures vary between suppliers and between product sizes, so treat the confirmed template or quotation as the final reference. The same cutline and bleed guide logic applies to related products such as custom acrylic standees, where the base slot adds one more cut element to plan around.
Hole Placement and Hardware
The attachment hole is part of the file, and it belongs on its own marked layer with a stated diameter. A hole placed too close to the acrylic edge concentrates stress and invites cracks, so give it breathing room from the cutline. Hole size follows the hardware you select: a simple split keyring, a lobster clasp and a decorative chain each pass through differently. Confirm the hardware and hole diameter in the quotation, and check their position in the proof, because a hole that lands on a character's eye is a layout problem the factory cannot fix for you.
Preparing Double-Sided Artwork
For a double-sided keychain, supply the front and back as separate, clearly labeled files or layers that share the same cutline. Whether the reverse side needs to be mirrored depends on the print method. When both sides are printed on the outer surfaces of the acrylic, each file prints as drawn. When a design prints on one face and is viewed through the acrylic, orientation handling changes. This is exactly the kind of detail that belongs in the proof confirmation, so label your layers honestly, add a note describing the intended result, and verify orientation on the digital proof before approving.
Many creators simplify the back side to a pattern, a logo or a flat color to control cost while keeping the front detailed. That is a legitimate production decision, and prepress can quote both options.
The Most Common File Mistakes
Production teams see the same errors repeatedly, and all of them are avoidable:
- Seventy-two DPI images saved from the web, enlarged to fit
- Files left in RGB color mode with neon palettes that will visibly shift
- Cutlines rasterized into the artwork, hidden on locked layers, or missing entirely
- No bleed, leaving white slivers at the cut edge after cutting drift
- Hairline strokes and micro-text that fall below printable thickness
- Live fonts that the prepress workstation cannot render
- Transparent zones that were accidents of layer management rather than design choices
- Hole markers drawn into the artwork layer, where they print as colored dots
- Front and back files with mismatched cutlines, so the two sides never align
A ten-minute self-check against this list saves a full round of file revision.
How Proofing Works Before Production
For any customized, made-to-order run, the proof is the contract between your file and the finished batch. A digital proof typically shows your artwork with the cutline, hole, white ink coverage and finished dimensions overlaid. Review it at real size: print the proof on paper or hold a ruler against the screen at one hundred percent zoom. Check the cutline against your intended silhouette, confirm the hole position, read every word of text, and verify that transparent zones match your plan.
Approval is the green light for production, and changes after approval can restart the queue. For large quantities or color-critical designs, request a physical sample first and treat the approved sample as the standard for the run. Final dimensions, tolerances and color standards follow the confirmed quotation and proof for your specific order, since these vary with size, thickness and finish.
Send Your Files for Review
The same file logic scales across product lines. Once your canvas, color mode, white ink layer and cutline are clean, adapting the artwork for acrylic standees or custom keycap keychains is mostly a matter of new dimensions. Modori Works manufactures custom merchandise from your original artwork or properly licensed designs, and we can sign an NDA before you share source files. When your custom acrylic keychain artwork is ready, submit it with your order inquiry at our custom acrylic keychains page, and the prepress team will review the file, confirm specifications, and return a proof for approval before production begins.
-

Modori Works Team
Custom B2B Merchandise Manufacturer
Authored by the engineering and production specialists at Modori Works. We share deep manufacturing insights, material breakdowns, and workflow guides to help global brands, artists, and event organizers bring custom acrylics, keycaps, and collectibles to life with strict IP protection.